How to use Auto Exposure Bracketing for HDR Photography
What is Exposure Bracketing
Making multiple pictures with different exposure levels is called exposure bracketing. Exposure Bracketing can be done manually and automatic depending on the possibilities of your camera.
Imagine taking a handheld photograph of a scene and you need to adjust your exposure manually… it is very probable that you will move your camera position and that’s exactly what we want to avoid – camera movement. It goes without saying that if you want to adjust the your exposure settings between the frames by rotating a camera dial manually, you definitely need a tripod.
Almost all modern digital cameras have a feature called Auto Exposure Bracketing (AEB).
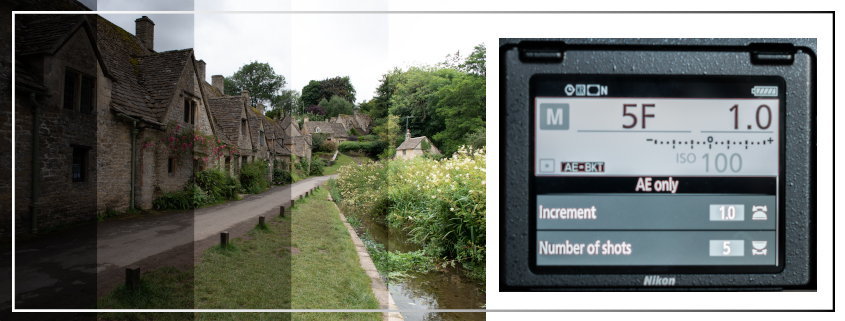
When AEB (and “AE only” as bracketing set) is selected, the camera automatically takes multiple photographs according to the set number of shots and the set increment in exposure for each frame. AEB allow us to set the number of pictures (brackets) we want to take and to set the difference in exposure between each picture.
The maximum number of shots and the difference in exposure differ from one camera model to another, but some higher end models, such as the NIKON D750 can go up to 9 consecutive shots and allow you to set the exposure increment from 1/3th of a stop till 3 full stops of light.
Thus, AEB will allow you to shoot multiple exposures in rapid succession with a single push of the button but if your camera doesn’t have this features, don’t let that stop you to make your HDR photographs by applying manual exposure bracketing method.
Auto Exposure Bracketing
Why should we use Auto Exposure Bracketing (AEB)?
Most DSLRs come with an Auto or Automatic Exposure Bracketing (AEB) feature, allows you to automate the process of taking multiple exposures of a scene.
Instead of taking one picture, adjust the exposure and press the shutter again, this feature allows us to take quickly a series of shots with different exposures by pressing the shutter only once.
Automatic Exposure Bracketing is useful to avoid touching the camera constantly between the shots. Manually adjusting the exposure between each individual shot can cause misaligned images by touching the camera for changing the exposure and pressing the button each time. Although this can be fixed in several photo software by aligning the frames but why fix something that can be avoided in the first place?
General method of Auto Exposure Bracketing
Let’s go through the different steps I take to set up my camera, to measure the base exposure correctly and to actually take all the exposures I need.
Making the HDR source photographs with automatic exposure bracketing:
- Check the basic camera settings
First I check that my camera settings are correct for HDR photography: picture format on RAW, ISO as low as possible and activating AEB on the camera. I can already set the parameters I usually use for my HDR photography (number of pictures = 5 and increment = 1 full stop of light).

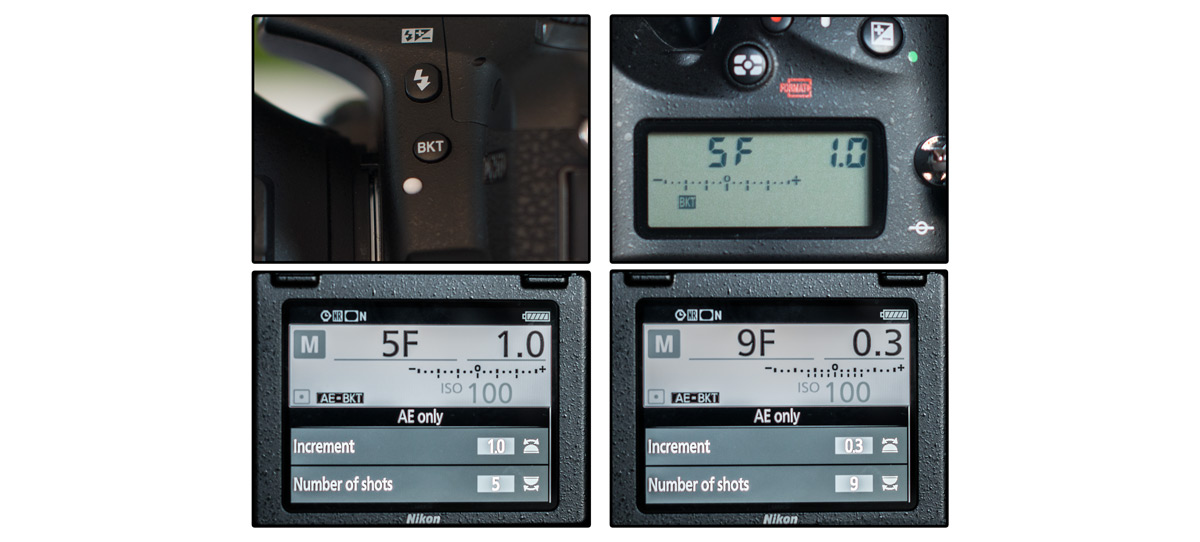
I usually shoot a bracket of 5 exposures with one stop of light difference (1EV). On a Nikon D750, we need to push the bracket button on the front side of the body and setting the parameters using the front and back dial.

As you can see on the image above, on a Nikon D750 we can check the AEB settings on the back monitor and the upper control panel display. The Nikon D750 can make up to 9 different exposures in AEB mode.
I prefer to set my camera to take the AEB exposures from lowest exposure to highest exposure. This facilitates reviewing the images later.

- Compose the shot
With the camera on a tripod, I make my composition of the scene.
- Put the camera into aperture priority mode (A)
Although I will do the actual shooting in M mode, the A mode allows me to easily measure the base shutter speed for the scene.
- Set the aperture
Then I adjust the aperture (f-stop) according to the light and the desired depth of field for the scene. In a low-light scene you may need to increase the ISO to keep a good depth of field and to keep the longest shutter speed below 30 seconds.
- Set the focus on the correct subject in the scene
Now focus on the actual subject in the scene by moving the focus point to the subject and pressing shutter half-way down.
- Measure the base exposure
With matrix metering active, and while focusing, I metered the scene (pressing the shutter half-way down), which gave me the shutter speed for the base exposure of the scene. Once this is done, I switch the AF off (on camera or lens).
- Put the camera into M mode
I don’t want the camera to recalculate and change the shutter speed again when I start shooting so I switch the camera to Manual Mode (M).

- Set the first shutter speed
My camera is set to take the AEB exposures from lowest exposure to highest exposure. Therefor I will manually set the starting shutter speed to the according shutter speed of (-2EV). For example, if I measured a base shutter speed of 1/100s, the according shutter speed for an exposure of two full stops of light less will be 1/400s
- Take the different exposure shots
With the AEB parameters set, and AEB active, Autofocus Off and on Manual Mode, all you need to do is push the shutter button down once and the camera will automatically take all the different exposure photographs.

In this picture of the Big Ben, I metered the shutter speed for the base exposure at 1/125s, I dial the shutter speed down to 1/500s and was ready to take the 5 frames.
Conclusion
AEB is an easy method once you tried setting the parameters a few times. One of the most important issues when taking the source photographs for an HDR picture, even with AEB is the risk of camera movement. You push the shutter to take the shot, which may result in camera shake especially for the first frame. This problem can be solved by improving the stability of the tripod, and by using the self-timer on the camera or a remote shutter release.
Now we have the different exposure images, we can start post-processing them to create a HDR photograph: Take a look how I create a HDR picture in one minute in Photoshop.
Try this technique and share your experiences with us.
Happy shooting!
Here are two other useful articles when you are going to create HDR images:


