How to start with HDR Photography – TUTORIAL
PART TWO – HDR TECHNIQUES, TIPS and TRICKS
Measuring the complete dynamic range with spot metering
When I use the manual or automatic exposure bracketing method, I use almost always the matrix metering to determine the base exposure (see both methods explained in the HDR tutorial part one).
In some cases, we risk not to cover the complete dynamic range of the scene. If I want to make sure to capture the whole 100% of the dynamic range I will measure the scene with spot metering.
Let’s go through the different steps I take to measure the dynamic range of the scene and show how I decide what exposures to shoot to cover this complete range of the scene.
Camera Settings
First I set the ISO and the aperture of my camera for the scene I will be shooting. To determine the complete dynamic range of the scene I am looking for shutter speeds, so I set my camera to Aperture priority (A mode).
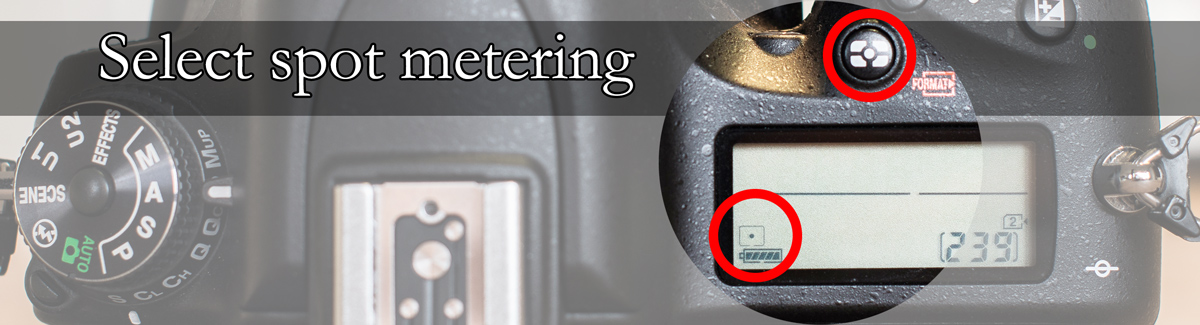
I make sure my camera autofocus (AF) is on and set to single focus point. I set the camera metering to spot metering mode.
Measuring the shutter speeds
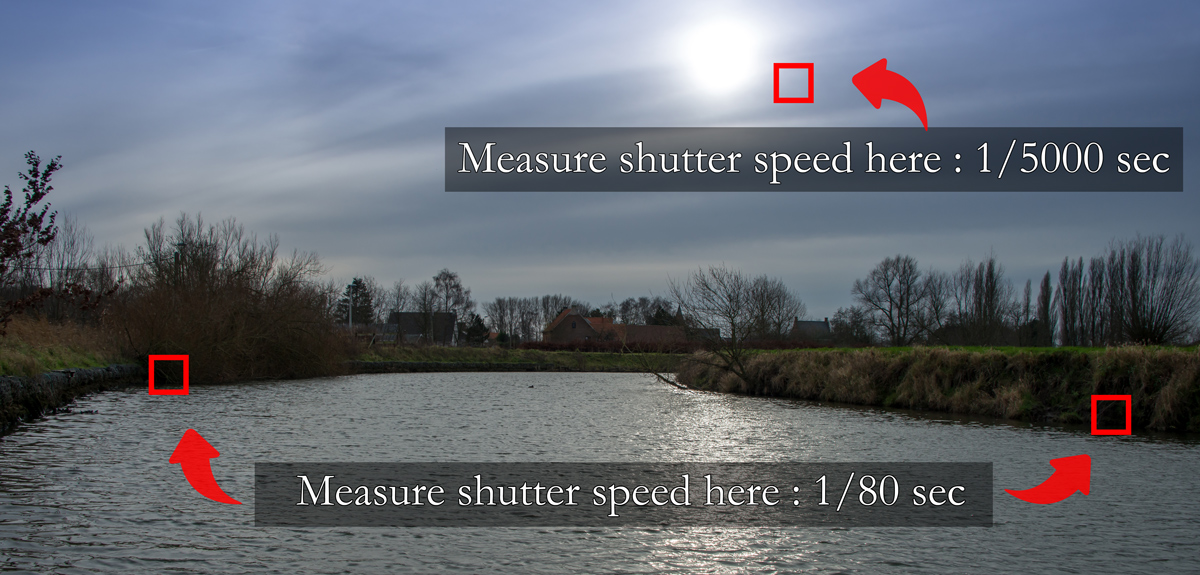
Now, to determine the shortest shutter speed, I will move the focus point to the brightest part of the scene, and I will measure the shutter speed for that point by pressing the shutter half-way down. If there is a sun in the scene, and the sun is the brightest part of the scene, then I will meter slightly to the side of the sun. If you measure for the sun, you will often end up with very high shutter speeds. If the sun is right above the horizon line, this might be acceptable.
I spot meter the brightest part and I will remember the shortest shutter speed of the scene.
Next I will determine the longest shutter speed. To do this I will move the focus point to the darkest part of the scene. I will spot meter the shutter speed for that point, by pressing the shutter half-way down, and I will also remember the longest shutter speed of the scene.
I need to make sure that the shutter speed remains under the longest possible shutter speed of the camera (on most cameras this is 30 seconds). If this is not the case, we cannot cover the whole dynamic range of the scene with the set ISO and aperture. This happens mostly in low-light situations (evening-night). I have two possible solutions to get a slower shutter speed: increase ISO or use a bigger aperture (smaller f-stop) or a combination of both. The aperture, I want to use for the photograph is largely determined by the required depth of field, so after changing the f-stop as far as I possibly (can) want, the only thing I can do next is increasing the ISO. We have to take into account that a higher ISO increases the noise level of the HDR photograph, so we have to be careful with this.
To do the spot metering, it may be necessary to loosen the ball head and move the camera or even to take the camera of the tripod, because sometimes it is impossible to move the focus point on the darkest or brightest part.
Decide what exposures to shoot the scene with and take the shots
Once I know the shortest and longest shutter speed, I can determine how many stops the dynamic range of the scene is. This is quite easy because each doubling or halving of the shutter speed is one stop of light (from 1/16s to 1/8s is one stop).
For example :
slowest shutter speed = 1/80 of a second
fastest shutter speed = 1/5000 of a second
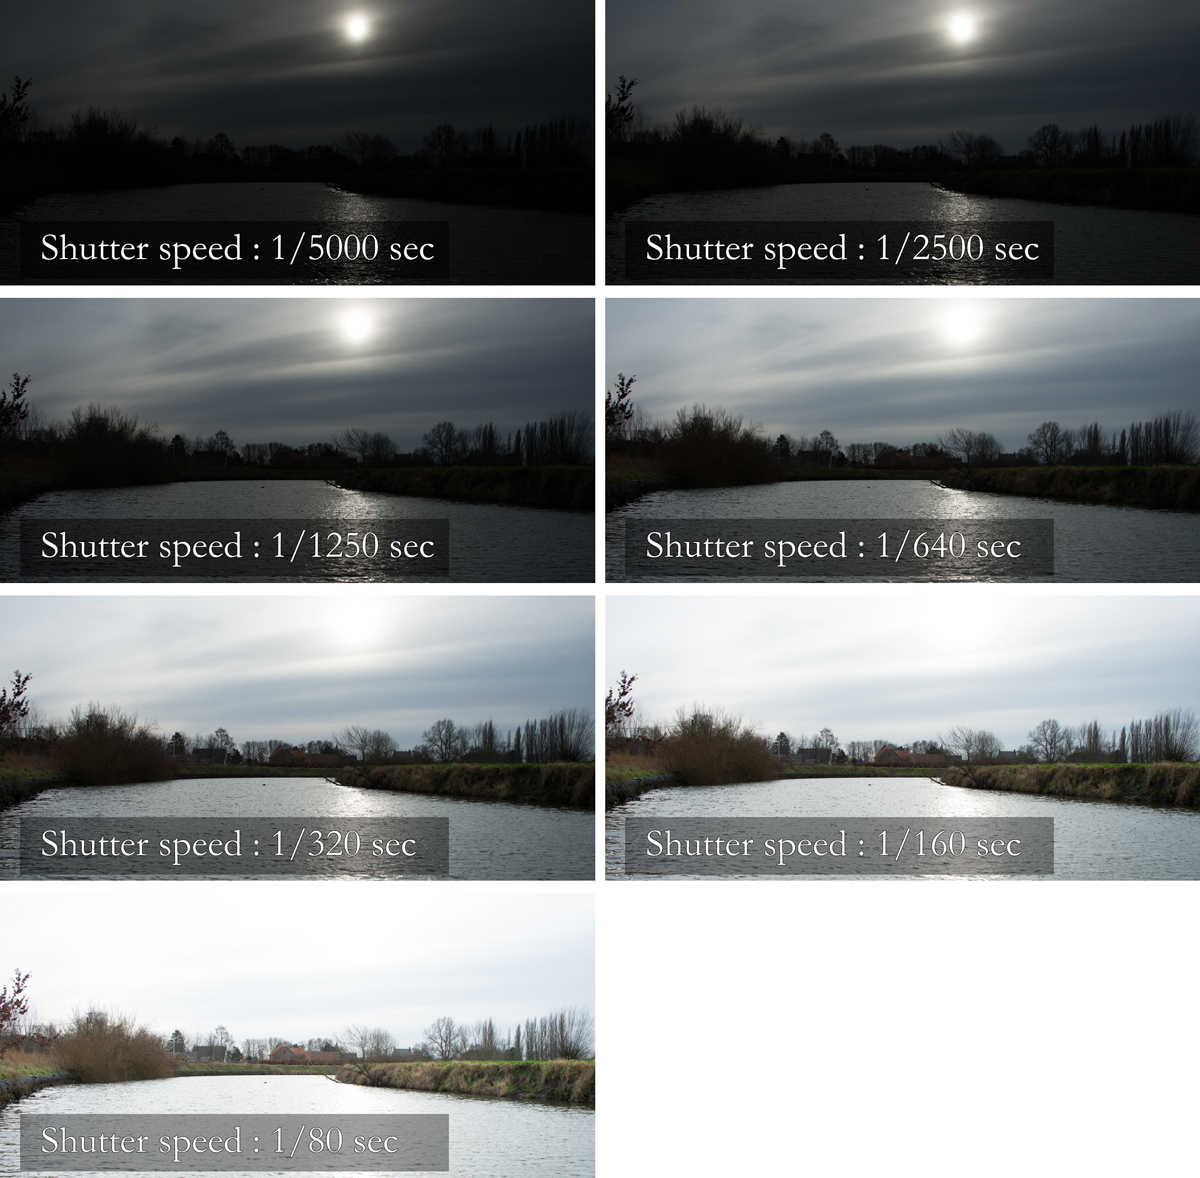
Dynamic range : 1/5000 s – 1/2500 s – 1/1250 s – 1/640 s – 1/320 s – 1/160 s – 1/80 s, a total of 7 different exposures with a difference of one stop of light between each image.
If my camera can handle the number of required exposures in AEB (Auto Exposure Bracketing), I could easily use AEB and shoot the different exposures. But if I have a camera without an AEB mode or a camera that has limited AEB possibilities and cannot handle the number of required exposures, I can shoot the exposures manually.
To do this I put the camera on the tripod, compose the image and set the camera in Manual mode (M). Next I will set the fastest shutter speed and now I can start shooting the exposures. So, I take the first shot. After each shot, I will dial the shutter speed one full stop of light (normally 3 clicks) to double the exposure time, and I will shoot the next exposure. I repeat this until I reach the longest shutter speed required.
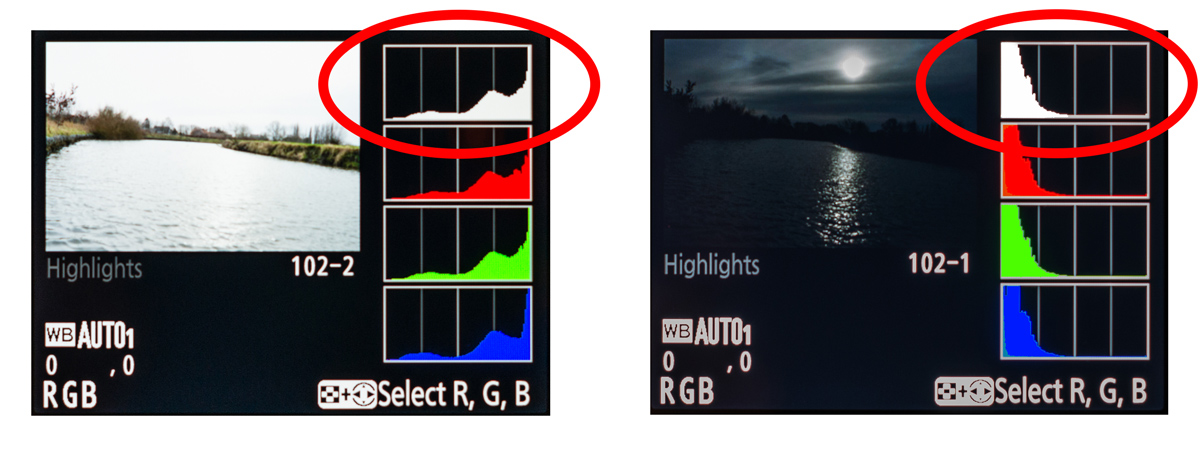
When all the exposures are shot, I will quickly check the histograms of the longest exposure and the shortest exposure to see that I have captured each end of the range of the scene. If I see one or either end of the spectrum is still ‘clipped’ and thus not captured, I can quickly add an exposure or two to get all the exposures I need.
The only thing left to watch out for is to repeat your spot metering, when the lighting situation changes. This especially happens when shooting sunrise or sunset, golden hour and blue hour.
I always shoot the exposures from darkest to brightest, so I start with the highest shutter speed (darkest exposure) and work my way down stop by stop to the slowest shutter speed until I have taken all the required exposures (this way my photographs are ordered from darkest to brightest). This facilitates to better group the photographs while scrolling through the results
Some of the newest cameras such as my NIKON D750 allow up to 9 exposures AEB, which covers usually the whole dynamic range. Using AEB helps to prevent camera shake, even on a tripod, as moving a dial and pressing the shutter each time can still cause some movement. The possible techniques I apply to prevent camera movement are discussed in the next chapter.
Techniques to prevent camera shake while doing Manual Exposure Bracketing
Use a tripod in a correct way – some tips & techniques
This is a no-brainer really. To shoot multiple exposures of one and the same scene, you want to make sure that your camera is as still as possible.
If there is one thing that will prevent you from layering the photos on top of the other while post-processing, or at least will lead to a loss in quality when tone mapping, it is having shifts in movement from image to image.
Although there exists a technique for shooting handheld HDR, it is in most cases very difficult to get high quality professional HDR results without the camera mounted on a tripod.
Basically we don’t want any movement in the scene when we capture the images. Even the trees or the flowers blowing in the wind, will change in position and will produce a “ghosting” effect.
If something is moving in the scene, you will have to manage the ghosting in post-processing too. So its better to prevent then to cure it.
This is why I carry my tripod just about everywhere I go. I believe that the tripod is, next to the camera and lens, my most important piece of gear.
Use a sturdy tripod
It goes without saying that heavier more sturdy tripods are more stable, especially in windy circumstances. Many photographers tend to start out buying a relatively cheap tripod. Sadly, this can be a false economy as many bargain because soon it needs to be replaced when it’s found not to hold the camera still in a light breeze.
Don’t extend the center column of the tripod
Almost every tripod has a center column that extends to allow higher shooting than just using the legs alone.
However, when I use this center column I always notice this provides a significantly less stable platform and often the camera wobbles more easily when it’s extended than when it’s dropped down. That’s why I recommend using the tripod’s legs adjustments to get the camera to the correct height and only use the center post as a last resort.
Use the top sections of the legs first to extend the tripod
The lower sections of the tripod’s legs are thinner and less sturdy than the upper sections. This means that the lower sections are a little less stable, so when the full height of the tripod isn’t required it’s best to extended the thicker, upper leg sections rather than the lower ones.
Avoid extending the center post
The center post is significantly less stable than the three legs spread out, so only use the center post as a last resort. This will often cause some frustration in setting up your tripod to that perfect height, but just remember that It’s helping you get the sharpest image possible.
Put your tripod on solid ground
Always look out for a good hard underground to put your tripod. A spongy vegetation underground, such as grass, make your tripod legs move if you don’t push them through until they meet solid ground.
Hang a camera bag or other heavy object on the hook below the center post for extra stability
Many tripods have a hook in place below the center post. In super windy conditions, it might help (especially for light tripods) to add some extra weight to your tripod by hanging something (l often use my camera bag) from the center post. Just watch out that the extra weight doesn’t start swinging in the wind and starts hitting the tripod legs.
Weighting down your tripod will also help during very low-light and nighttime scenes when your exposures tend to become multi-seconds per frame.
Turn off image stabilization
When I shoot with my camera on I tripod, and my lens has some sort of Image Stabilization/Reduction (IS on Canon / VR on Nikon), I will turn this stabilization setting off. Stabilization technology works by unlocking part of your lens, which allows the lens to “correct” movements. But, when your camera is sitting still on a tripod, the stabilizer of some lenses will often look for movement that isn’t there, and this could result in a blurry photo.
It’s a general rule of thumb that you should turn off stabilization when shooting on a tripod.
Use the internal timer or a shutter release system to avoid camera shake
Whenever I want to take multiple exposures for HDR, I know that every time I need to touch my camera and push the shutter button with my finger, I take the chance on camera movement and potentially risk ruining the shot. A shutter release system can solve this system. The point is, you have setup the tripod and stuff to ensure that the camera will not move, so why introduce movement by pressing the shutter, especially if you are exposing in a dark area?
Timer
Almost every camera features a timer system that delays taking a photograph for 2 to 10 seconds after you press the shutter button.
By using the 2 or 5 seconds timer, I can simply avoid the vibration caused by pressing the shutter button and improve the sharpness and the alignment of the different exposure images I take. I use it for all my HDR photographs.
Shutter release
Another solution to avoid vibrations caused by touching the camera is using a shutter release system. This system will release the shutter when activated and can either be wired or wireless
Mirror lock-up
Most DSLR have mirror in front of the sensor that directs the light to the viewfinder when no picture is taken. The mirror flips up and down every time w take a picture. This movement can make the camera shake a tiny amount.
To avoid this shake we can use the mirror lock-up system to make the camera pause for a couple of seconds after moving the mirror up to take a picture.
On my D750, with the mirror lock-up mode selected, focusing and metering while pressing the shutter button half-way down, will make the mirror flip up. Then by pressing the shutter all the way down, the picture is taken and the mirror will flip back down. This system is best used with a remote shutter release system to avoid pushing the shutter button. I cannot use the internal timer together with the mirror lock-up system at the same time.
Live view will flip up the mirror also, so shooting in live view will have same effect as mirror lock-up.
